1. First Steps
To enable AfterPay in a first class experience you should prepare your checkout, and then set up the authorization of the AfterPay payment
options with our CheckOut Services, before you complete the integration with the order management calls. We recommend to also implement our
additional services (e.g. Customer LookUp) to support with the collection of consumer information.
They optimize the authorization and checkout experience of the consumer.
In order to easily understand how the AfterPay API works read through a first intro of our main concepts.
2. Main Concepts
In order to easily integrate with AfterPay we have adapted the terminology stemming from the usage of CreditCards as much as possible.
Hence, our checkout services are triggered via authorization calls. You can either use the simple One-Step Authorization or Two-Step Authorization.
To manage the order after authorization has been successful, use the Order Management calls: Capture, Refund and Void.
Furthermore, explore our additional services, such as the checkout optimizing Customer LookUp that minimizes the required consumer input or our
Address Correction that helps eliminating annoying errors due to typos or spelling mistakes. The validate bank account can be used to facilitate
installments in the DACH region.
2.1. CheckOut Services
As stated previously, we have two ways of authorizing a payment. Either you use the simple One-Step Authorization, that approves the payment based on the shopping basket (e.g. OrderValue, VAT), the consumer (e.g. Name, Address) and which AfterPay Payment Option is chosen (e.g. 14-day invoice, consolidated invoice, fixed instalments or flex payment). Or you use the Two-Step Authorization that lets you evaluate which payment options shall be presented based on the shopping basket (e.g. OrderValue, VAT) and the consumer (e.g. Name, Address).
One-Step Authorization
Two-Step Authorization
2.2. Order Management Services
To fit into organizing nature of your business the Order Management is an important part of payments. Order Management enables you to manage all transactions that happen for an order. Easily capture previously authorized funds, void an unsettled transaction, or do a full or partial refund of a settled transaction.
Capture
Refund
Void
2.3. Additional Services
Customer LookUp
Validate Address
Validate Bank Account
3. Your First request to AfterPay API
In order to send requests to AfterPay an AfterPay account is needed. To create a new account, register on the My Account page. The API key will be generated automatically after account creation. If you don't see it immediately, refresh the "Account" page after a few seconds and it will appear. The page also shows you how long the key will be valid. Your API Key is stored in your account and will be used for authentication. API Keys have to be present in every request.
Let’s start with the easiest request in the AfterPay API - the GetVersion request.
GetVersion does not require any input parameters (except your API key of course) and returns the simple message containing only the version of the API. This example serves as a baseline for future requests and introduces the core concepts in AfterPay API.
Generally all our requests can be tested with Postman, however you can use any other API-Testing application.
Your first transaction with AfterPay in Postman
Open Postman and an empty request window. The current tutorial shows you how to get the API Version. The GetVersion page in documentation gives you the URL and a method for a request.

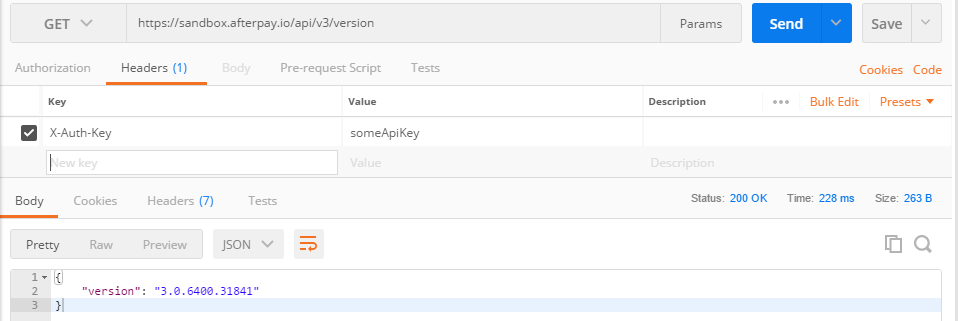
Insert the https://sandbox.afterpay.io/api/v3/version to the URL input box and select the corresponding method (GET in this tutorial) from the dropdown list. If the "Send" button is pressed, the request is sent to the AfterPay server and the response can be seen in the Postman window.

As you can see from the picture (and from your Postman window), the server responded with status code 401 Unauthorized and the response body contains an error message. The error appeared because the AfterPay API did not know who made the request and did not grant access to its services. To avoid this kind of error, the API key must be provided for authentication. There is a button with the label "Headers (0)" under the URL box. In this tab it is possible to define the list of all headers which are sent during the request. (0) in the tab label indicates that there are currently no headers.

For authentication, the header "X-Auth-Key" must be added to the list of headers.
The value of this header will be your personal API key (you can get this key from your account).
If the request is sent again, the server responds with status code 200 "OK" and the response body contains the version of the current API.
The same request principles apply for the other available requests too.