Introduction
WooCommerce is a popular extension for the WordPress online publishing platform, which turns a WordPress instance into a fully functional webshop.
AfterPay has developed a plugin that easily integrates with a WooCommerce webshop. It is a simple way to let your customers start using AfterPay at checkout.
You don't need advanced technical skills to add AfterPay to your webshop!
What you need:
- A WordPress instance with the WooCommerce plugin installed and configured.
-
An API key. For testing purposes, you can get one from your Account Manager at AfterPay..
-
When you are ready to go live, contact your Account Manager at AfterPay. They will configure the AfterPay backend to accept your webshop, and give you the real production API key.
-
You will also need to include the AfterPay logos and Terms & Conditions / Privacy Policy links in your webshop's design, especially the Checkout page.
Contact Us
If you are thinking about offering AfterPay to your customers, please don't hesitate to contact our sales team. We will be happy to walk you through the setup and integration process.
AfterPay is currently available in the following countries:
- Netherlands
- Belgium
- Germany
- Austria
- Switzerland
- Sweden
- Denmark
- Norway
- Finland
Get WooCommerce
This document assumes you already have a working, configured WordPress site, with the WooCommerce extension installed. If you don't, you can download the software and learn how to use it here.
Many web hosting services have a backend tool that lets you install popular software packages with just a few clicks, and WordPress is often included in those.
Get the Plugin
You can install the AfterPay plugin via the WordPress Marketplace, by searching from your Plugins tab in the WordPress Admin, or here: https://wordpress.org/plugins/afterpay-payment-gateway-for-woocommerce/
If you do not want to use the WordPress Marketplace for whatever reason, you can also deploy the AfterPay plugin for WooCommerce in standalone mode:
- Go to https://mip.afterpay.nl/wp-content/uploads/AfterPay-Woocommerce-Plugin.zip and download the ZIP file to your workstation.
-
Open your Wordpress Admin Panel (usually https://yoursite.com/wp/wp-admin/).
- Make sure WooCommerce is correctly configured. There should be a WooCommerce section in the left-hand menu.
- In the left-hand menu, go to Plugins > Add New.
-
Next to Add Plugins in the top left corner, click Upload Plugin.
- There may be third-party extensions in the WooCommerce plugin marketplace that enable AfterPay integration. However, these are unofficial and not supported by AfterPay's developers. To ensure correct functionality, always download the most recent plugin archive directly from AfterPay.
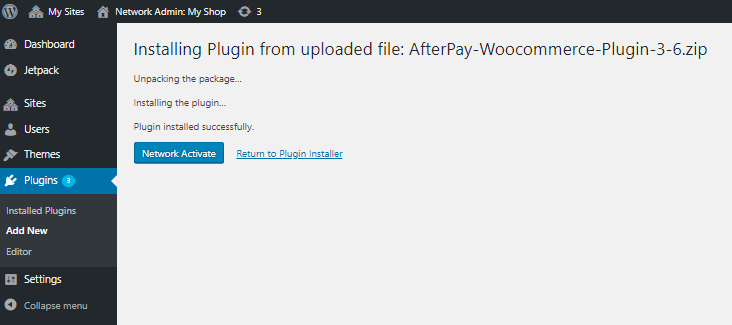
- Click Choose File and select the ZIP file you downloaded in step 1. Then click Install Now.
-
Wait for the installation to finish. Then, click Activate.
- If you are the administrator of a multi-site WordPress instance, it will say Network Activate instead.

Upgrade the Plugin
If you have installed the plugin via the WordPress Marketplace, it should update automatically. If you have installed the plugin in standalone mode/directly, then when a new version of the plugin is released:
- Open your Wordpress Admin Panel (usually https://yoursite.com/wp/wp-admin/).
- In the left-hand menu, go to Plugins > Installed Plugins.
- Find WooCommerce AfterPay Gateway and click Deactivate.
-
After the page refreshes, find WooCommerce AfterPay Gateway again and click Delete.
- Your settings will not be lost - they are kept in a settings file within your WordPress instance, and will be re-applied to the new version of the plugin.
- Go to https://mip.afterpay.nl/downloads/#woocommerce-add-on and download the latest version of the ZIP file.
- In the left-hand menu, go to Plugins > Add New.
-
Next to Add Plugins in the top left corner, click Upload Plugin.
- There may be third-party extensions in the WooCommerce plugin marketplace that enable AfterPay integration. However, these are unofficial and not supported by AfterPay's developers. To ensure correct functionality, always download the most recent plugin archive directly from AfterPay.
- Click Choose File and select the ZIP file you downloaded in step 1. Then click Install Now.
-
Wait for the installation to finish. Then, click Activate.
- If you are the administrator of a multi-site WordPress instance, it will say Network Activate instead.

Configure the AfterPay Plugin
Once you have your Auth keys for all the countries where you will be offering AfterPay, the next step is to configure the plugin's settings.
Configure Taxes
AfterPay assumes that your WooCommerce webshop already has the correct tax classes - the VAT categories and tax rates for your products.
-
In some countries, certain items such as books, food, event tickets, etc. may have VAT rates that are smaller than usual, or even zero.
-
These rules must be configured to ensure that AfterPay handles tax, invoicing and settlement correctly.
- See WooCommerce's own documentation for help.

Configure Portfolios
Each combination of a country (Netherlands, Germany, Sweden, etc.) and AfterPay payment method (14-Day Invoice, Direct Debit, Part Payment) is a separate Portfolio under the Payments Settings. In some countries, there are also separate B2B portfolios for business-to-business (as opposed to business-to-consumer) sales - this accounts for different tax handling, etc.
You can have more than one portfolio enabled in each country.
To configure your portfolios:
- Open the WordPress Admin Panel.
- In the left-hand menu, go to WooCommerce > Settings, then select the Payments tab.
- Flip the Enabled switch for a portfolio to enable that combination of country and AfterPay payment method.
- Click Set up/Manage next to a portfolio to open its configuration screen.
- After you configure everything you want, click Save changes at the bottom.
The table below covers all possible settings. Not every setting is available in every portfolio. Use Ctrl+F to find a particular setting.
| Label | Description | |
|---|---|---|
| Enable/Disable | Check the box to make this AfterPay payment method available to your webshop's customers in this country. | |
| Title | Enter the name of the payment method, as it will appear to the customer on the checkout page. | |
| Extra information | Enter the extended information shown to the customer at checkout. This can be a detailed description, information about current campaigns, etc. | |
| Merchant ID | Enter the Merchant ID you got from your Key Account Manager. | Belgium / Netherlands only |
| Portfolio Number | Enter the Portfolio Number you got from your Key Account Manager. | |
| Portfolio Password | Enter the Portfolio Password you got from your Key Account Manager. | |
| API Key |
The Auth key for transactions. You can get a test Auth key from your Key Account Manager. You must use a separate Auth key for each country, but you can use the same Auth key for each payment method in the same country. |
|
| Lower threshold | The minimum shopping cart value for which AfterPay will be available as a payment method. Value is in the country's local currency. | |
| Upper threshold | The maximum shopping cart value for which AfterPay will be available as a payment method. Value is in the country's local currency. | |
| Test Mode |
Check this box to tell AfterPay that you are making test transactions. In Test Mode, customer verification/risk checks always return positive, transactions won't be rejected because the address is wrong, and the money will not be added to the merchant's settlement account. There will be no emails sent to the customer, and no Customer Portal where they can pay the invoice. |
|
| Debug mail | If you enter an email address here, the complete technical details of each AfterPay transaction in your webshop will be sent to that address. | |
| Show phone number |
Check the box to ask the customer for their phone number in the AfterPay section of the checkout page. If your WooCommerce checkout page is already configured to collect the customer's phone number, you can leave this unchecked. |
|
| Show gender | Check the box to ask for the customer's title (Mr/Mrs, etc.) in the AfterPay section of the checkout page. | |
| Show terms and conditions |
Check the box to display AfterPay's Terms & Conditions text and checkbox in the AfterPay section of the checkout page. The content is provided automatically by the AfterPay plugin. The text will be in the country's local language, and specific to that country's legal requirements. |
|
| Use custom housenumber field | Enter a custom label for the "House Number" field in checkout. Leave empty to use the default label. | |
| Use custom housenumber addition field | Enter a custom label for the "Apartment Number" field in checkout. Leave empty to use the default label. | |
| IP Restriction |
If you enter an IP address, this portfolio will only be displayed to customers coming from that public IP address. This is useful in testing mode - you can show the payment method only to your own computer or office network until you are ready to go live. To find your current public IP, go to Google.com and type in "what is my ip". |
|
| Enable captures |
If you check this box, the plugin will attempt to Capture the orders automatically. Do not check this box if you have a warehouse/stock management system that is separately integrated with AfterPay (using the same Auth key), and it sends the Capture call when an item is shipped, independently of the WooCommerce webshop. |
|
| Way of Captures |
|
|
| Status to capture based on | If Way of captures is set to Based on Woocommerce status, the plugin will capture the invoice amount as soon as the order is set to this status. | |
| Enable refunds |
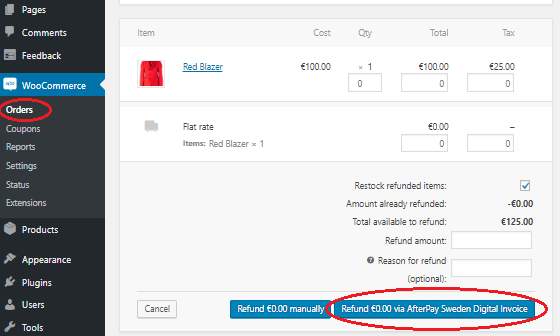
Check this box to allow refunds from the webshop's backend interface. They will be processed by AfterPay. Otherwise, any refund to the customer will have to be handled entirely outside AfterPay. To refund an order via AfterPay, open your Wordpress Admin Panel and go to WooCommerce > Orders > click on an order > Refund. You will have two options: Refund manually (outside of AfterPay) and Refund via AfterPay.
|
|
| Refund Tax Percentage |
The VAT rate used when you make a refund via AfterPay. Because the AfterPay module can refund a given amount (but not individual invoice items), the VAT share of the original invoice amount needs to be handled correctly. If you have items that were charged at a non-standard VAT rate, use Refund manually. |
|
| Compatibility with Germanized | Check this box to use a Title (Mr/Mrs/etc.) field that's customized for German-speaking countries, instead of WooCommerce's generic Title field. | |
| Enable profile tracking | Check this box to enable the Profile Tracking fraud-detection mechanism. Contact your Account Manager for more info about setting this up. | |
| Client ID for profile tracking | Your unique ID for the Profile Tracking mechanism. This can be provided by your Account Manager. | |
Testing & Go Live
Once your webshop has been configured with test Auth keys, you can make a test purchase using AfterPay as the payment method.
- If you want to test the whole chain, ask your Key Account Manager for an Auth key to the Afterpay Client Test environment. You can use this in Test mode. You will receive confirmation emails, and will be able to see the invoices in MyAfterPay, the customer portal used for payment and invoice management.
- Once you and your Key Account Manager are happy that everything is in order, you will get a Live Auth key, and can start offering AfterPay to your customers!